Navigation Pane
EKS Deployments with Gitmoxi GitOps
⚠️ IMPORTANT: Before proceeding, complete all steps in the Getting Started section to install Gitmoxi, create your private
gm-trialrepository, and add that repository to Gitmoxi.
Overview
This guide walks you through testing Gitmoxi’s GitOps-based deployment for Amazon EKS by:
- Creating EKS cluster and associated infrastructure required to test workloads
- Deploying Kubernetes Resources (Deployment, Service, Secret, Config, and IngresS) using Gitmoxi GitOps
- Performing a Blue/Green update to test changes
- Cleaning up test resources
Note if you installed Gitmoxi in EKS, then you have already created a cluster. You can skip directly to Create EKS Test Workload.
Infrastructure Resources
We’ve provided a sample Terraform setup to create the necessary infrastructure for EKS. Ensure your IAM role has the permissions to create the following resources in the us-west-2 region:
| Category | Resources | Purpose |
|---|---|---|
| Networking | • VPC • Public Subnets • Private Subnets • Internet Gateway • NAT Gateway • Security Groups | Network setup for EKS cluster and workloads |
| EKS | • EKS Cluster • Node Group (Amazon Linux 2) • ALB Controller (via Helm) | Hosts your Kubernetes workloads and manages ingress via ALB |
| IAM | • EKS Role • Node IAM Role • OIDC Provider • ALB Controller IRSA Role | Access control, Kubernetes integration, and IAM for Service Accounts |
| Kubernetes | • aws-load-balancer-controller Service Account | Allows ALB Controller to authenticate with IAM via IRSA |
| Helm | • aws-load-balancer-controller Helm Release | Deploys AWS ALB controller into the EKS cluster |
Note: The default region is
us-west-2. You can change it in themain.tffile if necessary.
If you have not cloned your gm-trial repo then clone it first. Below commands clone it in your HOME directory but you can clone anywhere.
cd ~
git clone git@github.com:$GITHUB_USER_NAME/gm-trial.git
Switch into the directory and export the working path:
cd ~/gm-trial
export WORKING_DIR=$PWD
Create Infrastructure for EKS Test Workloads
You should have set environment variable with the Gitmoxi task IAM role from the Getting Started section. The task role is needed to provide Gitmoxi access for creating and updating the EKS resources. When you installed Gitmoxi on ECS/Fargate in the Getting Started section you have alerady set the environment variable with this role.
Navigate to the Terraform directory for EKS.
cd $WORKING_DIR/eks/core-infra/terraform
export TF_VAR_gitmoxi_iam_role_arn=$GITMOXI_TASK_IAM_ROLE
terraform init
terraform plan
terraform apply --auto-approve
export EKS_CLUSTER_ARN=$(terraform output -raw cluster_arn)
aws eks update-kubeconfig --region us-west-2 --name gitmoxi-eks
Create EKS Test Workload
We’ll now deploy a sample application using Gitmoxi by committing Kubernetes manifests. The awk command is replacing placeholder cluster arn in deployment_definition.yaml with your EKS cluster arn that you created above.
Copy the sample manifests:
cd $WORKING_DIR/eks/apps/blue-green-update
cp sample/blue_deployment.yaml.sample deployment.yaml
cp sample/service.yaml.sample service.yaml
cp sample/ingress.yaml.sample ingress.yaml
cp sample/secret.yaml.sample secret.yaml
cp sample/configmap.yaml.sample configmap.yaml
awk -v arn="$EKS_CLUSTER_ARN" '{gsub(/clusterArn: CLUSTER_ARN/, "clusterArn: " arn)}1' sample/deployment_definition.yaml.sample > temp.yaml && mv temp.yaml sample/deployment_definition.yaml.sample
cp sample/deployment_definition.yaml.sample deployment_definition.yaml
cd $WORKING_DIR
Verify that the files were copied correctly:
git status
You should see the following files as untracked:
Untracked files:
  (use "git add <file>..." to include in what will be committed)
	eks/apps/blue-green-update/configmap.yaml
	eks/apps/blue-green-update/deployment.yaml
	eks/apps/blue-green-update/deployment_definition.yaml
	eks/apps/blue-green-update/ingress.yaml
	eks/apps/blue-green-update/secret.yaml
	eks/apps/blue-green-update/service.yaml
Add and commit the files:
git add .
git commit -m "creating nginx workload on EKS"
git push
Gitmoxi Commit Dryrun
Perform a dryrun to verify that the new files are valid and relevant for Gitmoxi:
gmctl commit dryrun -r $GITMOXI_DEMO_REPO -b main
Sample output:
latest_commit_hash                        previous_processed_commit_hash            file                                                   change             relevance
----------------------------------------  ----------------------------------------  -----------------------------------------------------  -----------------  ------------------
39477924369a5f61370d789aa16a7f169fbf47a4  e37578c8049a5eccdab40f189ed45df4d2912d6c  eks/apps/blue-green-update/configmap.yaml              added_or_modified  k8s_relevant_files
39477924369a5f61370d789aa16a7f169fbf47a4  e37578c8049a5eccdab40f189ed45df4d2912d6c  eks/apps/blue-green-update/deployment.yaml             added_or_modified  k8s_relevant_files
39477924369a5f61370d789aa16a7f169fbf47a4  e37578c8049a5eccdab40f189ed45df4d2912d6c  eks/apps/blue-green-update/deployment_definition.yaml  added_or_modified  k8s_relevant_files
39477924369a5f61370d789aa16a7f169fbf47a4  e37578c8049a5eccdab40f189ed45df4d2912d6c  eks/apps/blue-green-update/ingress.yaml                added_or_modified  k8s_relevant_files
39477924369a5f61370d789aa16a7f169fbf47a4  e37578c8049a5eccdab40f189ed45df4d2912d6c  eks/apps/blue-green-update/secret.yaml                 added_or_modified  k8s_relevant_files
39477924369a5f61370d789aa16a7f169fbf47a4  e37578c8049a5eccdab40f189ed45df4d2912d6c  eks/apps/blue-green-update/service.yaml                added_or_modified  k8s_relevant_files
Gitmoxi Commit Deploy
Now trigger the actual deployment using:
gmctl commit deploy -r $GITMOXI_DEMO_REPO -b main
Monitor deployment progress from the Gitmoxi UI under EKS -> Live Deployments. If you did all steps in Getting Started section and are in the same terminal then you can print the UI URL via:
echo $GITMOXI_ENDPOINT_URL
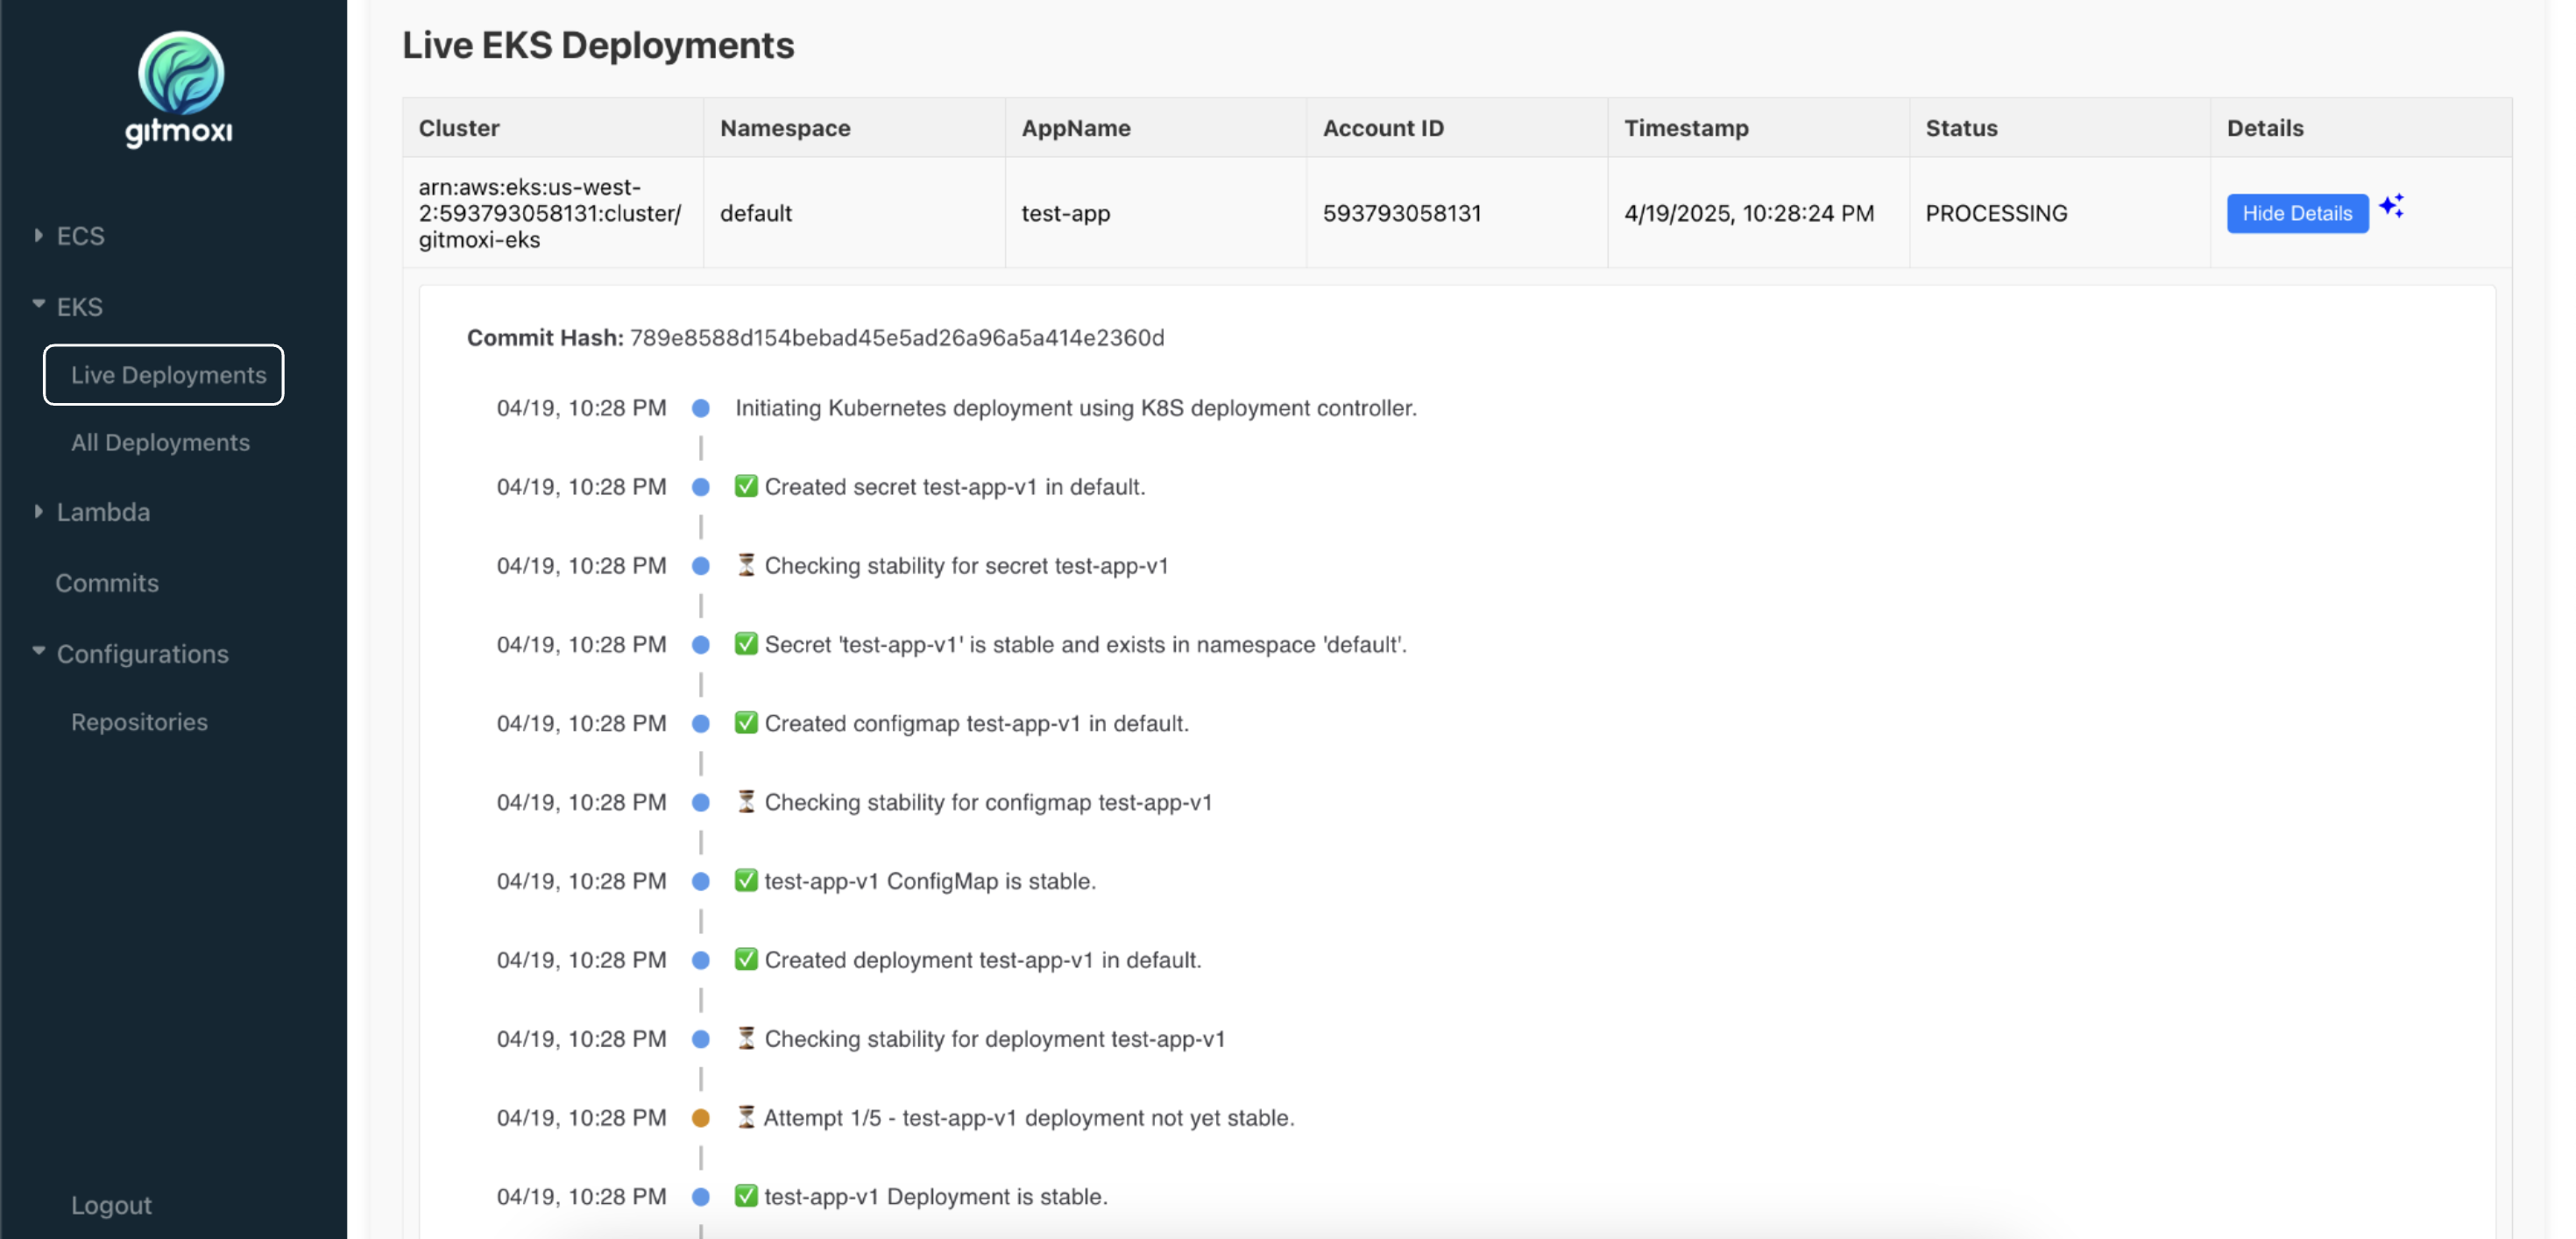
You should now see a live deployment named test-app in your EKS cluster. You should see a new deployment test-app created in your EKS cluster in AWS console as well. Validate it by running:
kubectl get all -n default
You will need to wait about 2-3 minutes for the alb ingress controller to provision a new load balancer and get it to ACTIVE state. Once the load balancer is active, you can validate that the application is exposed on the load balancer endpoint. You should see the output state BLUE VERSION.
curl -s $(kubectl get ingress test-app -o=jsonpath='{.status.loadBalancer.ingress[0].hostname}')
Perform a Blue/Green Update
Let’s update the container image from BLUE to GREEN to test blue/green updates. We will be doing a linear traffic shift, moving 25% of traffic every 15 seconds from old to new tasks.
cd $WORKING_DIR/eks/apps/blue-green-update
cp sample/green_deployment.yaml.sample deployment.yaml
cd $WORKING_DIR
git add .
git commit -m "updating image from blue to green"
git push
Trigger the update:
gmctl commit deploy -r $GITMOXI_DEMO_REPO -b main
You should see this new deployment ongoing on the Gitmoxi UI. Once the traffic shifting starts, you should start seeing the annotations being updated in the ingress. You can confirm that by running:
kubectl describe ingress -n default
You should see blue-green=update-v2 in the ingress annotations. Now you can start pinging the alb endpoint to see the output flip between BLUE VERSION and GREEN VERSION while the traffic shifting is underway.
curl http://$\(kubectl get ingress -n default -o jsonpath='{.status.loadBalancer.ingress[0].hostname}')
How Gitmoxi GitOps Works
The gmctl commit deploy command initiates Gitmoxi’s deploy workflow:
- Gitmoxi retrieves the latest commit from Github.
- It compares current files with the last processed commit.
- If any of the relevant kubernetes manifests are modified, it triggers deployment.
This approach separates infra (Terraform) and Kubernetes manifests, making the setup modular and maintainable.
Clean Up
To delete the deployed resources:
kubectl delete all --all && kubectl delete ingress --all && kubectl delete secret --all && kubectl delete configmap --all
To delete the entire EKS infrastructure:
cd $WORKING_DIR/eks/core-infra/terraform
terraform destroy --auto-approve
Congrats!
🎉 You have successfully deployed, updated, and managed a Kubernetes workload on Amazon EKS using Gitmoxi GitOps!
Also, checkout:
Ready to Simplify Your Deployments?
Join teams who have eliminated deployment complexity with Gitmoxi's GitOps-native approach.